Overview
By the end of this post, you will know how to deploy C#/F# code to an AWS lambda and access that lambda over an HTTP request.
You will need to set up an AWS account. The example here should be free or very close to it.
Installing the required tooling
AWS lambda
AWS has published a dotnet tool to allow for easy publishing of lambda functions. The source for the tool is here
Run in terminal:
1
dotnet tool install -g Amazon.Lambda.Tools
AWS .NET Core templates
Installing .NET Core templates make setting up new projects super easy. There is a range of templates with support for ASP.NET Core, various AWS resources in both C# or F#.
Here is a post with more details on this
Run in terminal:
1
dotnet new -i Amazon.Lambda.Templates
AWS - lambda HTTP API
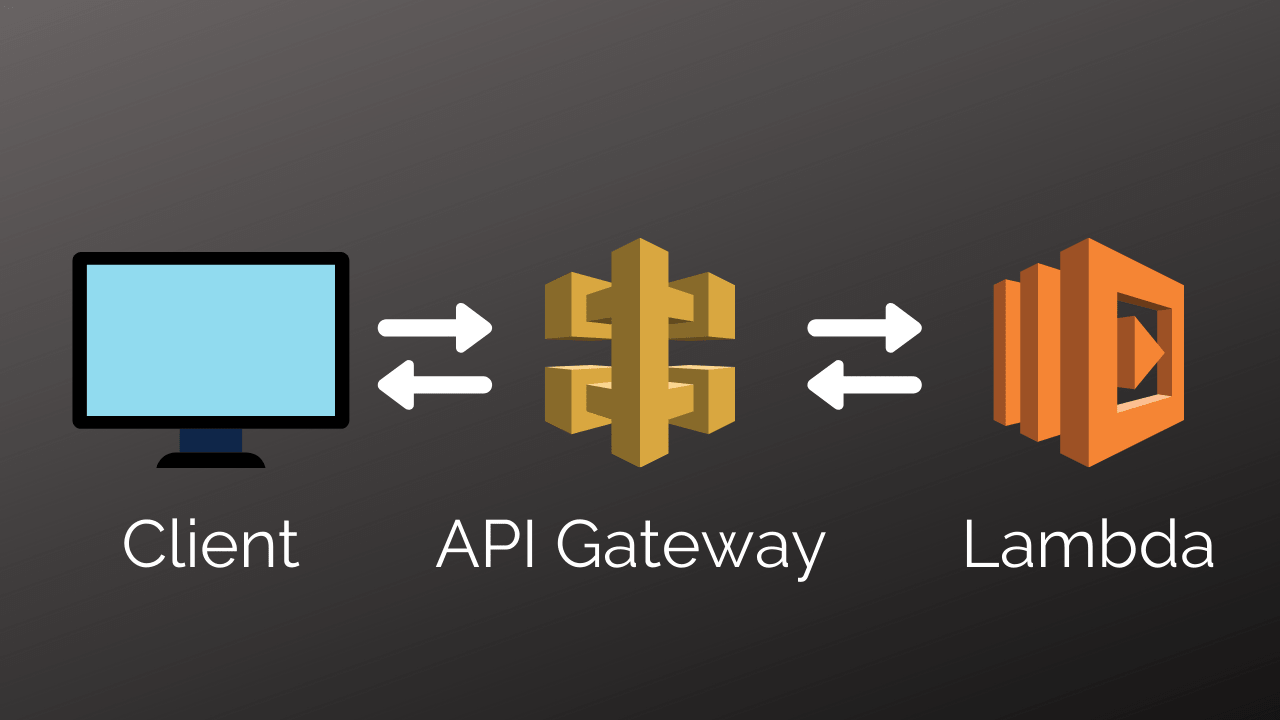
A picture tells a thousand words, so here is a diagram of how this works:
Which leads to the following steps to set this up:
- create a Lambda function
- using dotnet
- deploy code to the lambda function
- create an API gateway
- attach the gateway to the lambda
- deploy the endpoint
- invoke with a client
.NET Core new project
This step is really simple. We are going to create a new empty project on our computer.
Run dotnet new to list of options. If you don’t see any AWS templates - see Installing the required tooling above
The following templates should all be compatible with API Gateway:
- serverless.AspNetCoreWebAPI
- serverless.EmptyServerless
- serverless.Giraffe
I am going to use serverless.AspNetCoreWebAPI, if a different option is chosen then API Gateway might need to be configured differently.
Find your favourite dir for new projects and run (-n is for the name which I have chosen AWS-NetCoreExample):
1
2
3
dotnet new serverless.AspNetCoreWebAPI -n AWS-NetCoreExample
cd src/AWS-NetCoreExample
dotnet lambda package
This example works out of the box too for F#. Just add
-lang F#to thedotnet newcommand above.
The first line creates the project. We then change dir to where the main app is. The last line uses the AWS tool to create a zip file of our code. Note down the file path of the zip file created. We will use that later to upload our lambda function.
Creating the lambda in AWS
Login to your AWS account.
Open Lambda from the menu: 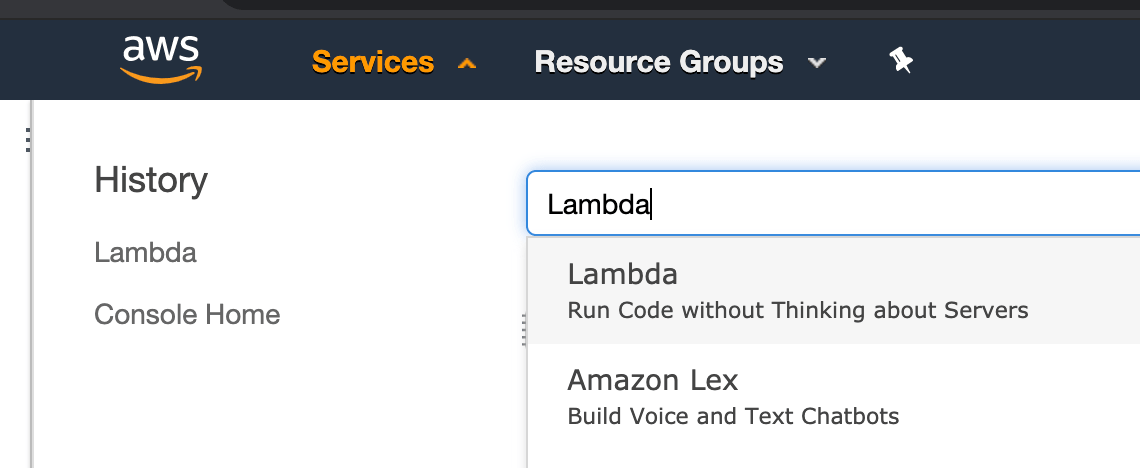
Then create a new function:

Choose the right defaults for the function. We want to run on .NET Core 3.1, along with an appropriate name. 
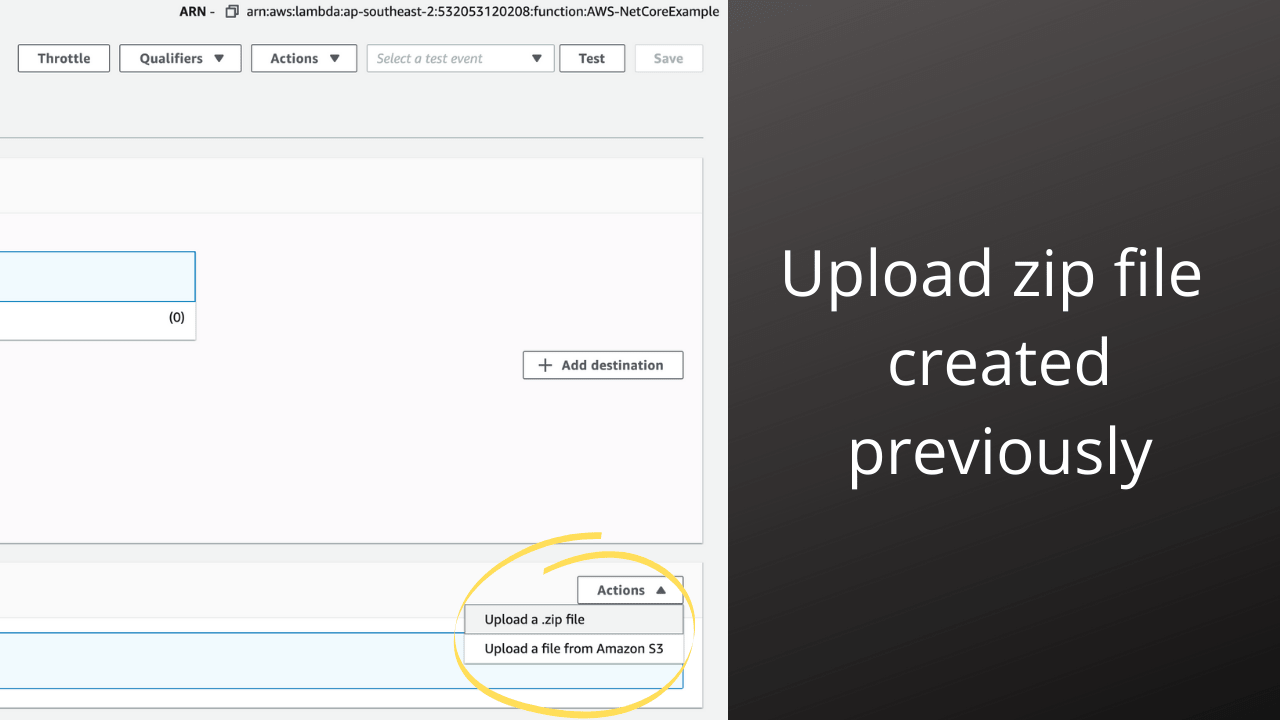
We will also start with a manual upload. Locate the zip file created earlier and upload the newly created Lambda function:
After we have updated the zip file, we need to update a few settings for our lambda.
First, we need to tell AWS how to invoke our lambda. This is called the handler. The template already has this, but given we are doing this manually (ie not using serverless or cloud formation) we must set it manually.
Run the following, and copy the value in quotes:
1
cat serverless.template | grep Handler
In the AWS lambda console, click Edit under Runtime Settings and paste in the value for Handler. If you would also like to save a bit of money, go ahead and set the memory to 128MB. For this example, there is little need for anything more. Don’t forget to click Save
Creating the API Gateway
Create
Head over the API Gateway from the top menu and select Create API.

This step is key to ensure the API is compatible with the lambda code we created earlier. The HTTP API has some different settings and would require a code change in LambdaEntryPoint.cs.
Configure
After that, we need to create a proxy resource. Click on the Actions button and then select Create Resource

Check the box Configure as Proxy Resource, the rest of the settings are fine.

Then click Create Resource
Complete the setup by selecting the lambda function.

After clicking Save the API is now configured. The last step is to deploy it.
Deploy
From the Actions menu select Deploy API

Go ahead and create a new stage name. The name is not too important here. Conventions might be something like staging or prod. I’ll go ahead and use example.
Once confirmed the API will now be ready for use. The public URL will be shown as Invoke URL:.
Invoke the endpoint
Go ahead and click on the URL for Invoke URL, a new tab should be opened and you will see {"message":"Missing Authentication Token"}. Append the URL with and endpoint from the template /api/values. In my case, this makes the full URL https://657jlbscae.execute-api.ap-southeast-2.amazonaws.com/example/api/values
A response of ["value1","value2"] should be received if all went well.
That completes all the AWS setup for the API Gateway and Lambda Function.
Uploading the zip file each time can be a real pain though. It’s not a very fast turn-around. Let’s fix that by creating a micro CI pipeline.
Automated upload
Code setup
For this to work, we’ll add a bash file (I’m sure this will work in PowerShell too) that will run our tests, package the lambda, and then upload to our AWS Lambda.
create a shell script pipeline.sh in the root of the folder (at the same level as src and test).
Add the following lines :
1
2
3
4
5
6
set -e

dotnet test dotnet test test/AWS-NetCoreExample.Tests/AWS-NetCoreExample.Tests.csproj
cd srcAWS-NetCoreExample/
dotnet lambda package
dotnet lambda deploy-function AWS-NetCoreExample --region ap-souttheast-2 -frun dotnetcore3.1
The first line set -e ensures that if anything goes wrong in our script, the script will exit with an error. More importantly, it won’t update the lambda. The next line leverages the simplicity of .NET Core and runs all the unit tests. We have seen the third line before.
The last line is a bit new. This is the command that will update the newly created zip file and upload it to AWS for our lambda. Be sure to update the names and region for what is appropriate for you.
You can find a list of the names of the regions by clicking on the region name in AWS.
It shouldn’t be too surprising that if we run the script (more specifically the last line) that it will fail. We need some credentials otherwise anyone could update our code.
Upload credentials - AWS IAM
IAM is the service that controls this. We are going with a very basic approach here, so this is probably not the most secure or suitable for enterprise.
In the AWS Console, head over to the IAM service. Navigate to Users and then Add User. Enter a name, this example uses Example and be sure to select Programmatic access and then click ‘Next: Permissions`.
For the permissions, select the box Attach existing policies directly and then in the search box add lambdaFull and check AWSLambdaFullAccess. Here we are giving our API keys full access to do anything with lambda.
For this getting started blog-post, this is probably fine. For enterprise development, it would probably be wise to restrict access to only uploading zip files. Click Next: Tags
No changes are required for Tags. Click Next: Review. Review the details and when happy click Create User.
Be sure to copy the Access key ID and Secret access key
Setting credentials locally
It’s now time to use the Access key ID and Secret access key. This is installed on the home folder on the computer, not in the git repository so everything is safe to add (we don’t want our secrets ending up in GitHub)
Create/Update the following file: ~/.aws/credentials (For Windows users: C:\Users\USERNAME\.aws\credentials)
1
2
3
[default]
aws_access_key_id = your_access_key_id
aws_secret_access_key = your_secret_access_key
Navigate back to the folder with our pipeline.sh file. It’s time to run it.
If everything was done correctly, the script should complete and the lambda should be updated.